- OEM Service[1]
- Navigation & GPS[10]
- Keyboards[2]
- PDAs[10]
- Scanners[4]
- Earphones & Headphones[1]
- Speakers[10]
- Camera Lenses[5]
- Joysticks & Game Controllers[2]
- HDD Players[1]
- Other Audio & Video Equipments[1]
- MP3 Players[7]
- EL Products[7]
- Frame[1]
- Mobile Phone Bags & Cases[4]
- Microscopes[1]
- CCTV Camera[8]
- CCTV DVR[2]
- Other Security & Protection Products[10]
- Mobile Phone Cables[3]
- Mobile Phones[10]
- Wristwatches[2]
- Contact Person : Mr. Willis ouyang
- Company Name : Shenzhen OKFAN Electronics Co., Ltd.
- Tel : 0086-755-83040915
- Fax : 0086-755-83042580
- Address : Guangdong,Shenzhen,Rm711,Futian Building,Shennan Zhong Rd, Futian District, Shenzhen , Guangdong Province,China
- Country/Region : China
- Zip : 518033
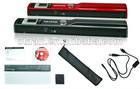
Wirelss WiFi Transmission Pen Scanner Skypix TSN44W


Related Product Searches:Wirelss WiFi Transmission Pen Scanner Skypix TSN44W,High Quality,wifi transmission scanner, skypix tsn44w,TSN44W
New Arrival Wirelss WiFi Transmission Portable Scanner Skypix TSN44W
1. Key features
Color/ Mono JPEG/PDF scan selection
900/600/300 dpi scan selection
Directly save JPEG/PDF files to the micro SD card
Support the micro SD card up to 32GB
Driver free to download for Windows 7 / Vista / XP and
Mac OS10.4 or above (directly plug-in, driver installation not required)
2. Using the scanner
2.1 Installing the battery
1.Open the battery door.
2.Insert 2x AA alkaline batteries (not included)into the battery compartment.
3. Turn on the scanner by pressing the [POWER] button for 2 seconds.
2.2 Inserting a micro SD memory card (not included)
You must insert a micro SD Card (not supplied) to record and store your pictures. Inserting the micro SD memory card:
1. Turn OFF the scanner. 2. Insert the micro SD card into the micro SD card slot, and gently press in until the card is latched.
Note: Do not force the card into the slot; forcing may damage both the scanner and the micro SD memory card. Align the micro SD card position (as marked) and try again
Note: The micro SD memory card must be formatted before scanning. See the following instructions.
2.3 Time setting
1.Press [TIME SET] to enter time setting mode
2. In the LCD, it shows 1 XX, and press (JPEG/PDF & DPI) buttons for up & down number selection
3. Press ( SCAN ) button to confirm setting
4. In the LCD, it jumps to next setting mode as below sequence
After all the information has been set, press ( TIME SET ) button again to exit
2.4 Formatting the micro SD memory card
1. Insert a new micro SD card into the scanner, and then turn on the scanner.
2. Press the format button into format mode. “F” shows on the LCD.
3. Press the Power/Scan button to start formatting the micro SD card.
4. SD card indicator will blink until format is complete.
2.5 Setting the resolution
Press the [DPI] button to select High / Medium / Low resolution.
High/ Medium / Low resolution icon will be displayed on status LCD.
2.6 Setting the scan mode
Press the [JPEG/PDF] button to select JPEG/PDF mode.
JPEG/PDF icon will be displayed on status LCD.
2.7 How to calibrate the scanner
Note: Perform calibration only when white balance needs adjustment
1.With the dry cleaning cloth provided, clean the scanning lens located on the bottom of the scanner.
2.Turn on the scanner by pressing the [POWER] button. Place the scanner on the white area of the White Balance Calibration paper provided.
3.Press and hold the Color/Mono button. While holding the Color/Mono button, press the [POWER] button and then release both buttons to enter into auto-calibration mode. SD symbol will flash and then stop. “GREEN” and “RED” LED light will turn on.
4. Do not move the scanner. Wait until the “RED” LED turns off. “GREEN” LED will stay on.
5.With only the “GREEN” LED light on, start scanning the white paper by sliding the scanner across the paper until the “GREEN” LED light turns off. (Slide the scanner backwards if necessary).
6. Press and hold the [POWER] button to power off the scanner. Calibration is complete.
2.7 How to scan
Hold the document firmly by one hand.
Place the scanner on the start-scanning position.
Hold the scanner tightly and press the scan button once.
Slide the scanner slowly and keep your hand stable to get the best quality picture.
Press the scan button again to stop scanning.
2.8 How to use WIFI function
You can use the facilities with built-in WIFI module (such as PCs, laptops, IPAD, IPHONE and so on) to view the scanned images.
2.9 Connect your WiFi Scanner
1. Turn on your scanner and switch to WiFi mode
2. The blue LED flashes to indicate the WiFi warming up. It will take around 15-20 seconds for WiFi to warm up and become connectable which the LED will stop flashing
3.Switch to other mode to turn off the WiFi anytime.
Notes
1)WiFi will drain your camera battery. Switch to other mode if you are not using it.
2) Your WiFi scanner can only connect to one device each time.
2.10 Connect the scanner to your computer
1.Turn to WiFi mode of your scanner
2. go to network setting of your PC and choose WiFi setting. Search the network, find and click “MAGICWAND”
3. Enter password “123456789” and you can connect to your camera.
4Open your Internet browser and input “192.168.1.2”. You can view the jpeg or pdf stored in your scanner
2.11 Connect the scanner to your smart device (browser)
1.Turn to WiFi mode of your scanner
2.Go to network setting of your mobile device and choose WiFi setting. Search the network, find and click “MAGICWAND”
3. Enter password “123456789” and you can connect to your camera.
4. Open your Internet browser and input “http://scanner.local”. You can view the photos and videos stored in your camera.
4.12 Connect the scanner to your smart device (app)
1. Search MagicWand app at the App store.
2. Download and install the app to your smart device
3. Turn to WiFi mode of your scanner
4. Go to network setting of your PC and choose WiFi setting. Search the network, find and click “MAGICWAND”
5. Enter password “123456789” and you can connect to your camera.
6. Open your app. You can refer to app page for the detailed operation description.
Wirelss WiFi Transmission Pen Scanner Skypix TSN44W